My name is Sergio. I am one of the Octalysis Prime members who took part in Food Heroes Challenge 2. This challenge made the Octalysis Prime community want to contribute to making the Food Heroes user experience more and more engaging for many kids who, together with their parents and teachers, discover and develop better eating habits and at the same time make the world a better place.
Gamification or Game Design?
One of the goals of this challenge was to plan a game experience that could have been replayed in different contexts (dining table, canteens, classroom) and able to guarantee long term engagement. The aspect that I found to be more stimulating was surely the necessity to plan the experiences according to both the logic of gamification and the rules of game design.
Regarding the first of these two points, “5-Step Design Process” by Yu-Kai Chou has been the most useful and complete guideline to approach the process with a “human-focused design”. For the latter, I found it useful to refer to inspirations very close to me: the Octalysis framework, the elemental tetrad by Jesse Schell and my own gaming experience.
The fourth element is my son. He is 7 years old and he -unknowingly- helped me through the analysis of the gamers and gaming tests (bearing patiently and bravely with the sudden changes in rules and supporting my work with his encouraging “Dad, when are we going to play your game again?”).
Gamification and Game Design
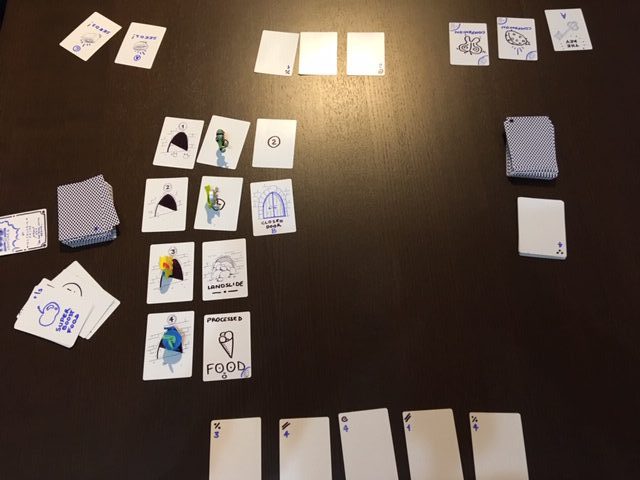
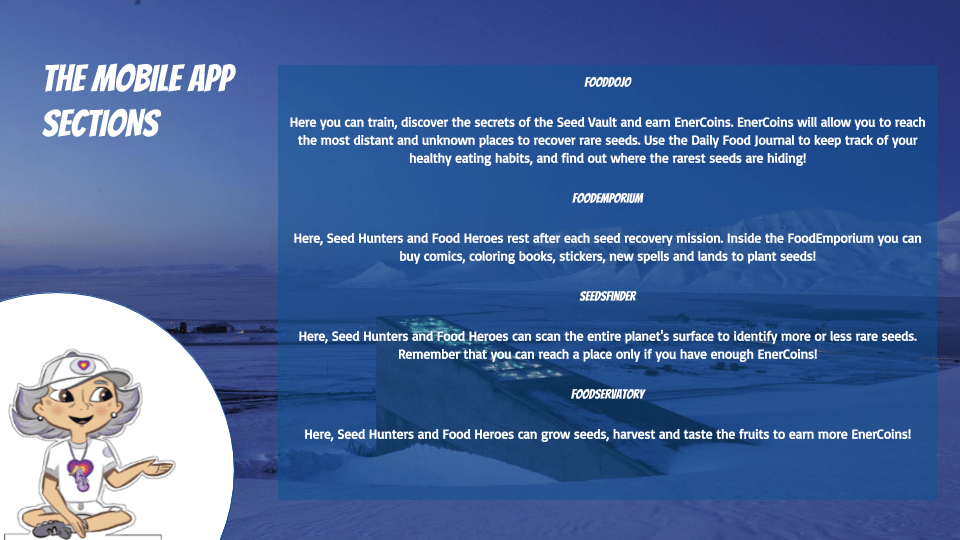
In this article, I would like to share with you five tips that have been useful to me in the design and realization of FoodVentures, a card game, similar to “dungeon crawler” in which the players explore dungeons, facing challenges and hazards while looking out for seeds and keeping them. FoodVentures was planned, taking into consideration the four aspects listed by Jesse Schell as basic elements of every gaming experience: aesthetics, story, mechanics and technology. The card game FoodVentures is thought of as a component of a bigger project, including activities and player experiences not just practically but also digitally, through an app for mobile devices.
5 Useful Tips to Design Your Game Prototype
#1 – Work on The Aesthetics (as Much as You Can)
Visual design has a key role in any gaming experience and it is constituted by the visual stimulus used to evoke specific sensations in the player. Colours shapes and materials used for the components, fonts, style of the illustrations contribute to project the player in the game’s setting, being it historical, futuristic or abstract.
FoodVentures aims to put the player in the same atmosphere of the entire Food Heroes project, using illustrated cards with elements ascribable to learning goals (types of healthy foods, colour, season, food’s typical environment); the fastest way to develop a “playable” prototype was to start from a white deck of cards and a set of markers. I looked up online for graphic elements to sketch the white side of the cards, to make it “kids proof”(extremely hard task if you’re using a symbolic -and not evocative- language). A good alternative to drawing could be printing the images in good quality on adhesive paper and put the cards in protective card sleeves to shuffle them easily.
#2 – Write Your Story
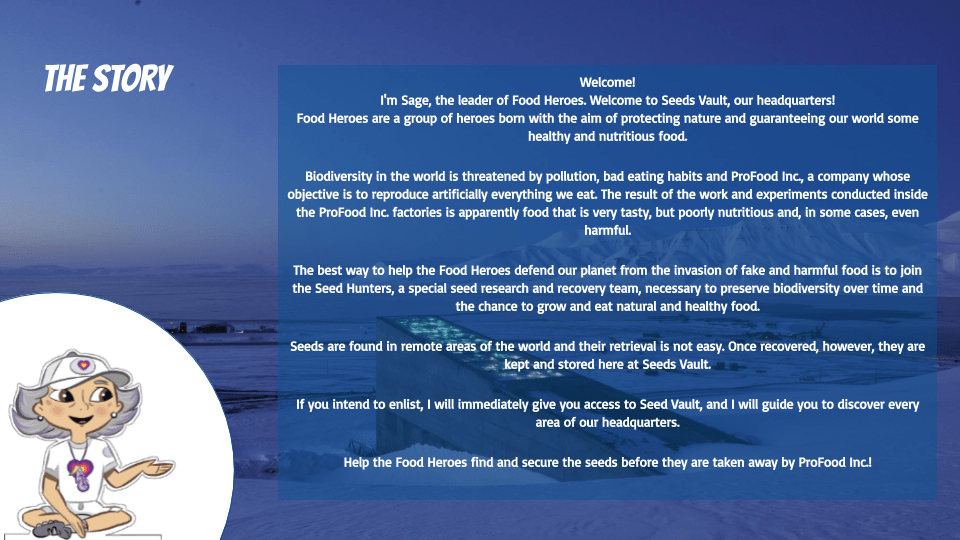
A Game Loop is one of the fundamental elements for a good outcome of the game. A linear experience with no boosters (Game Technique #31) does not benefit the long term engagement of the player (boosters allow players to design game strategy). Through the correct use of boosters, you can stimulate the player to form his own strategy and plan ahead, pushing them to discover many different means of interaction with the various elements of the game, resulting in a different gaming experience every time. The first question I asked myself when beginning to write a storyline for FoodVentures was: “Is there in the project any legends, mysterious places, fun facts or bizarre character to inspire me?” The answers were many, but I decided to start from the fascinating and special place: Seed Vault, an existing place in Norway where the genetic heritage of original seeds is kept and preserved. This place was the baseline for the following story, framing the FoodVentures game.
The story was then helpful for choosing a suggestive name for each and every element of the game, like the virtual value, powerups, hurdles, and eventually villains, levels, experience points and so on. Obviously there are many other ways to give a sparkle to your creativity and write a good story for your new game, one of my favourites is Fabula, a card deck that allows you to always have all the elements to build your own stories or analyse someone else’s, from the easiest to the most complex.
#3 – Define the Mechanics
The first game I ever designed was a bad copy of Monopoly. As most of the games designed by somebody who has only ever played Monopoly has and will always be. Once, during an interview with a game designer, I asked him what he thought of my game. He said, “it depends”. “If it is a game for classrooms, it is fine. If you want to sell it, there’s a long way to go”.
Confronting with him was really interesting, and the biggest lesson I got out of it was “if you want to design good games you have to play, play, play”. Since then, I started discovering and experimenting with new games, and I started seeing the point he was trying to make. I tried many games, some of them just once, some of them I bought and some of them I‘ll never be able to try. Luckily for me, on YouTube, there’s a whole army of enthusiasts who show through video materials previews, and mechanics of games that would have otherwise been inaccessible to me. I discovered that watching tutorials is the best way to learn more about games and get inspired.
#4 – Choose the Technology
The technology is represented by materials used (cardboard, wood, plastic, augmented reality software, cards…) that are needed for the gaming experience. For my project I chose a practical gaming experience based on a card deck, mainly for four reasons:
- Scalability, the development of new elements and expansions can guarantee a good level of re-playing
- Portability, the fact that the whole game consists of two decks of cards makes it easy to use in a classroom as well as a restaurant, or at home
- Collectability, the cards can be used for the gaming experience, both competitive or collaborative, or just be collected
- Personalisation, the deck representing events regarding dungeons or places to explore can be set in a new way every time, allowing the player to choose a setting that will go well with the hurdles, treasures and event cards
#5 – Try it With People, Take Notes, Improve It, Repeat
Once that the first prototype is ready, you just have to try it. Friends, family and acquaintances can be amazing playtestesters. Grab pen and paper and note down any adjustments needed to improve the gaming experience altogether.
This phase is probably the hardest, but so worth it. A good gaming experience normally takes a long trial before being ready for the market.
Ultimately, a fun game that you won’t get enough of is a game in which the aesthetic, story, mechanics, technology elements are used with balance and in the right way.
These five tips can set you off to a great start if you’re moving the first steps in the fascinating art of game design.
Are you ready to play it your way?
About the author

Sergio Ligato is a proud Octalysis Primer since January 2019. Works in a Vocational and Educational Training center in Italy since 2001, writes and speaks about edtech in live events and on the internet. Loves gamification, game design, free software, learning and teaching technology.